|
Cleaning your stallion at least once a month will ensure your components function better and last for years to come. Washing your bicycle is easy, but there are a few components that need a bit more attention than others. To wash your bike, prepare the following items:
PREP – if you have multiple gears, place your front chain on the biggest chain ring, and your rear on the smallest. This will help clean the chain later and more easily remove the rear wheel (if you are so inclined). WET – spray down your bike with a garden hose or some rinse water. The goal is to get off the large chunks of gunk without blasting out the grease from your bearings. Keep in mind most of the dirt is going to be on the back wheel, around the drive train, and on the underside of your bicycle. DEGREASE – spray degreaser on your drive train. Apply liberally to the chain, front chainrings, and rear freewheel/cassette gears. Applying this on a wet bike allows it to set-into the dirt that collects on your drive train. Take special note to not spray it into your drivetrain bearings such as the bottom bracket where your pedals pivot through, rear hub on your back wheel, or the rear derailleur pulley wheels. Our goals is to remove grease from the external components of your bike, not to remove the needed lubricants inside delicate components. WASH – use your clean sponge or rag to liberally douse and scrub your bike frame from top to bottom with warm soapy water. Often forgotten places include under the seat, between the front and rear forks, brake pads and calipers (on bikes with hand brakes), and under the bottom bracket. Wash your tires, wheel, spokes, and hub. Use your old/dirty sponge to go over the chain to pull off the old gunk (it can be fairly dirty). Use more degreaser if needed at this point. Pay special attention to your front chain rings and rear gears to get in between them and remove the gunk. Pull off the dirt from your rear derailleur and pulleys (they tend to get caked in muck). RINSE – spray down your bike again to remove all the soapy water and remaining dirt. LUBRICATE – dry off your chain (it should look shiny and new). Apply chain lubricant per the manufacturer’s instructions (usually one drop per link, for the entire chain, then a quick wipe off of the excess after it has penetrated the chain). Consider lubricating your brake calipers but be careful to not get lubricant on your brake pads or braking surfaces. TUNE-UP – if you want to go a step further take out your wheels (if you have quick release hubs) and inspect them for debris in the tires. Carefully remove/pick out any thorns or rocks that could later puncture your inner tubes. Inspect your brake pads for the same debris. Look for signs of wear on the pads or the brake surfaces and replace if needed.
0 Comments
 Acceptable chain stretch Acceptable chain stretch The life of your bike will be extended with regular maintenance. Try our one-hour tune up this month! Clean your bike – it may not seem like an important part of the tune-up, but checking out your components is much easier with a clean bike. Plus you will stay cleaner, work faster, and enjoy this tune-up with a clean bike. Chain – your chain touches every aspect of your drive train. A worn chain can cause damage to other components of your bike. Inspect for rust, cracks, and stiff links. If you can pull your chain straight off the chain-rings and fully expose a tooth, you should replace the chain. 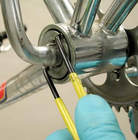 Bottom Bracket Bottom Bracket Bottom Bracket – this is the part of your bike that your pedals go through. These bearings take the brunt of the pedaling abuse. Spin your bottom bracket backwards (as if pedaling backwards). If you see anything other than buttery smooth movement, consider replacing the bearings. Gears – bikes that have indexed gears (one click on the gear selector moves to another gear ring) need to be adjusted periodically. If you are unable to select every combination of gearing on your bike (front and back gears) consider re-indexing/adjusting your derailleurs. Cables – over time break and gear cables will stretch, wear out, and become dirty. Replacing your cables is an easy job that only takes a few minutes to have your bike feeling like new again. 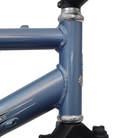 conventional headset conventional headset Headset Bearings – this is the part where the front tire forks meets your bike frame (how you turn the bike). Mud and grime tend to build up in this bearing. Cleaning it by removing the front fork and handlebars and re-greasing this bearing will prolong the life of your bike. 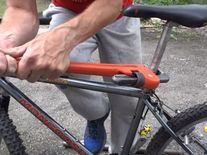 seized/fused seat post seized/fused seat post Seat post – your seat post can fuse to the frame over time without annual maintenance. Mark the height on the post before loosening and removing the post (and saddle/bike seat) from the frame. Wipe old grime and grease from the frame and post. Re-grease the post before re-installing and adjusting the seat to the mark you made.
Accessories – look over your bike and see what else may be installed that you are no longer using or is broken/worn. It is easy to overlook a broken water bottle cage or a missing grip or torn handle bar tape on a regular basis. Take time now to replace or remove these extras. Performing this tune-up twice a year will extend the life of your bicycle by many years. If you’d like to learn how to perform any or all of these tasks, join us for one of our bicycle maintenance events. We advertise our events on Facebook and in our monthly newsletter. 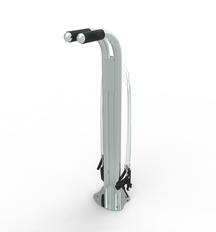 ValloCycle is happy to announce our latest contribution to the Montevallo cycling community. The Public Work Bicycle Stand, located on the Main Street side of University of Montevallo on Main (UMOM) was purchased and installed with a UM Green Fund Grant!
Here are some of the tools that are available for use at this excellent work stand:
A bicycle seat is also known as a saddle. Proper saddle positioning reduces fatigue, increases comfort, and improves the efficient transfer of power to your pedals. Most modern saddles can be adjusted in three ways (height, position over seat post, and incline). Follow these tips on setting the appropriate saddle height:
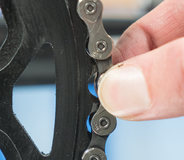
A clean and well maintained chain will prolong the life of your gears and reduce chain-wear and chain-stretch while helping your bike look its best. Remember that doing something to maintain your chain is better than doing nothing so follow these steps to keep your chain working and looking great:
|
ValloCycleOur articles also appear in the Montevallo Chamber Chatter - find us in print there! Categories |
 RSS Feed
